Here’s a great video providing DIY Quick Fix Copper Pipe Leaks. This way you can do quick temporary repairs just until the plumber comes. This answers the perennial question: “How do I stop my furnishings being damaged while I wait for the plumber”? When there is a really cold weather snap, there are never enough plumbers to attend to all the urgent leaks, and to avoid costly damage many DIY’ers successfully avoid water damage to their homes by following the simple strategies in our video below.
DIY Quick Fix Copper Pipe Leaks – Introduction
You really cannot do better then to follow the video instructions above, but if you need more hints, especially on DIY soldering read on!
Your home contains both hot and cold water lines, which supply potable water to your plumbing fixtures. Water pipes, by their very own design, are prone to blockages and leaks. Even a minor leak can cause massive damage to your home or your business, which in turn can cost you thousands to fix.
To keep water from flooding your home and seeping into your walls there are some precautionary steps that you should take to prevent such outcomes. Start by checking you water pipes regularly.
Periodic examination by a plumbing professional can help detect leaks before they cause real damage. This means preventive steps can be taken in time to keep mishaps from disrupting your life and your property. Insurance studies show that over 80% of claims in a home are a result of water line breaks.
Of course, preventing problems in the first place is just as important as knowing what to do when one arises. One of the biggest factors leading to a burst line is a pipe or pipes that have frozen.
To avoid frozen pipes, the first step is to ensure that your pipes, especially the pipes along an outer wall of your home, are properly insulated. Fortunately, insulating pipes is a fairly simple task. There are three main ways to insulate your pipes: self-stick insulation tape, tube foam insulation or heat tape. All three are available at your local home depot, lowes or other hardware store.
How to Repair a Leaking Copper Pipe Just Until the Plumber Arrives
When a copper water pipe corrodes and leaks, or bursts from freezing, you have to fix it fast. If the leak is pinhole-sized and less than 1/2 in. Of pipe must be removed, you can make the repair by cutting the pipe and soldering (“sweating”) on an ordinary pipe coupling.
Caution: before attempting any repair or modification to any copper or other water pipes in your home make sure you are working with water pipes! Natural gas and LP delivery pipes can look very similar to water pipes especially if you are working in tight, poorly lit spaces. In many cases the pinhole leak in the copper pipe will create an aqua/green discoloration to the surface of the pipe at the location of the pinhole.

Cut out the old pipe and solder in a new coupling
Repair clamp copper pipes are often plagued by pinhole leaks, and while their cause is hotly debated in plumbing circles, how to fix them is not.
There are a few different methods, including using a chemical sealant, solder , or replacing the damaged length of pipe using couplings, but the easiest strategy for any diy’er has to be using a repair clamp. Repair clamps are available in a wide variety of materials and sizes, and they can be found at most every home improvement center or hardware store. This job should take no more than 20 minutes to complete, saving you a call to the plumber and quite a bit
If the copper pipe has the pinhole-sized leakage, as a repair measure, cut and remove i/2 inch of the pipe and do soldering on an ordinary pipe coupling.
This can be another quick fix for a copper wire pinhole. It is to be noted that though soldering isn’t a complicated process, it need to do done properly in order to prevent any leaks.
Additionally, a heat shield should be used in confined spaces areas for safety. This can be done if the problem issue does not require professional help from leaking and pipe repair contractors.
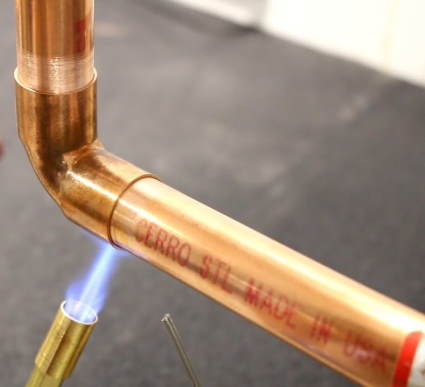
Flux the parts being fitted back together-inside of coupling and around the outside of pipe. Place the coupling over one pipe end and then insert the second end. Once you have completed this begin to heat with your torch. The solder will chase the heat so heat the coupling to draw solder inward-outside to inside the coupling.
You may need to use bread (yes bread) on the inside of the pipe if water is still present. The bread acts like a sponge while you’re heating the pipe and keeps water from coming into contact with the joint (sometimes it’s hard to drain all the water off). When the pipe is soldered the bread turns to mush, to be flushed out later.
Find a method to drain the line. If it’s on an upper floor, turning on a faucet downstairs may work. If it’s in the basement, there may be a hose bib outside that is below the joint you’re repairing. Leave the faucet open so that steam can escape. If you can’t find a suitable faucet, cut the pipe about a foot from the joint with a pipe cutter. You’ll have to repair it later by soldering on a coupling.
It’s really not that hard. Dig around the line to expose it so you can work on it. First, drain the line. Cut all of the damaged part out, including a few extra inches on either side. Solder in connectors and a new section of pipe.
You may not feel comfortable doing the work yourself, especially if you’ve never soldered. If you have it all exposed and ready to go a decent plumber or handyman could repair it in a few minutes.
In the long-term, you will need a solution that keeps the leak away for good. There are two ways to do this: with a compression fitting or with soldering. First, a plumber will use a hacksaw or a pipe blade to cut through the portion of piping affected. Then, they may insert a compression fitting in the area between the pipes, which effectively rejoins the two parts of the pipe.
Required Tools for this Pipe Repair Project
The easiest pex connection to make is by using the shark bite method, as no tools or rings are required. The first step in making this kind of a connection is the only step: simply push the end of your pex tubing into the shark bite connector–that’s it! a solid connection is instantly made with this method. Shark bite connectors can also be used with copper or cpvc pipe. 
Assuming the exact location of a leak or crack is found, an underground pipe repair or replacement can be done using a variety of materials or tools. Of course, approved water line and sewer repair materials vary. The following list should be considered temporary repair materials, not a permanent solution. In addition, since around 80% to 90% of underground pipe repair work involves excavation and then backfill, a temporary repair usually makes little sense.
While it’s possible to repair a leaky water pipe on your own, fixing a leaking sewer line may require the services of a plumber. Before you decide to take on this kind of project yourself, consider the type of pipes that were used, along with the health-related issues involving exposure to human waste.
Required Materials for this Pipe Repair Project
There are many materials used in plumbing projects. Showers and sinks need to be installed and there is a lot of technical planning that takes place before beginning the project. How much pipe is needed?
Generally, majority of people use copper pipes as a plumbing material for running interior water lines. Leaks can occur any time in a copper pipe and people mostly make use of materials like repair clamps or repair couplings to fix pinhole leaks within the pipe. The repair clamps offer a temporary solution to the problem whereas repair couplings are considered as permanent solutions. Here are the ways through which one can fix pinhole leaks using these two materials.
 Cut the damaged section from the pipe by cutting at each mark with a tubing cutter. Wrap emery cloth around one side of the cut pipe. Twist the cloth around the end of the pipe five to six times or until the end of the pipe is shiny. Clean the other end of the pipe entering the opening with the emery cloth.
Remove the damage section of the pipe. First, turn off the shut valve to cut the supply of water coming from the main line. However, with the presence of a local shut valve, you can cut water supply from here instead.
Second, drain the damaged pipe to ensure water is in the pipe. Third, with a copper tube cutter, remove the section of the pipe at least an inch from each side of the leak. With the cutter, grip the pipe and tighten the cutter screw. Once it is in place, rotate the cutter with a full revolution several times until the section of the pipe you want to remove detaches from the pipe.
Fixing a pipe inside a wall is no easy task, so it’s a lot better to let a professional plumber deal with this. But if you feel confident you can do it yourself, just follow these instructions. Cut out sections of the damaged drywall with a saw. Once you are completely sure where the damage is located, cut the wall in order to have access.
It is always prudent to talk with a plumbing professional before repairing a pinhole leak in copper pipe. They know how to stop a copper pipe leak, and how to repair a pinhole leak in a copper pipe in the most effective and efficient way. Still, it’s important to understand – in general terms – how to fix a leaky copper water pipe.
Conclusion to “Ways to Do A Quick Fix on a Leaky Copper Pipe”
A copper pipe can spring a leak inside your home at any time. It can also occur without any warning signs. But that does not always present an emergency plumbing situation. Most homeowners are not well versed in soldering, which may be the best method of repair. But there are other quick fixes. One way to fix a leak in copper pipe is with flair fittings. Another way is with compression fittings.
Always be cautious when dealing with a pinhole leaks in water pipes while taking steps for short-term or long-term repair. And call a professional when it’s time to have water pipes replaced. Let us know which repairing method you found the easiest and which one you applied to fix yours? we would love to hear from our readers.
The method you use to stop leaky pipes will depend on what kind of leak it is. This goes beyond whether the leak is big or small. It also refers to whether the leak is located in the joint or in the pipe itself. Knowing when to use what method isn’t always obvious. That’s especially true considering that the types of pipe you have also effect what approach to take. Sometimes, big leaks are better fixed by a professional plumber.
Before we dive into fixing emergency repairs, we should examine exactly what an emergency repair might entail. There are a lot of telltale signs for an emergency copper pipe repair situation. They can range from seemingly normal to drastic and recognizing the signs will be an important step in finding what exactly you need to fix. Let’s explore some of the potential emergency copper pipe situation signs, shall we?.
With the plumbing thoroughly checked for leaks it’s finally time to install the new tub. The first step is to consider and plan for the bathtub “foot” – the piece that runs from the overflow outlet to the drain and on to the sewer collection. Ask yourself if that pipe can be installed and still clear any studding and the floor? exactly how does the one you have connect and do you have all the parts?.
Begin by closing a shutoff valve that leads to the leak or shut off the water at the main valve where your water line enters your home. To remove the piece of leaking pipe or fitting with your pipe cutter, open the pipe cutter by twisting the knob on cutter counter-clockwise.
 The two rollers spread apart when twisting the knob. Spread the rollers apart enough to slip over the pipe you are cutting and twist the knob clockwise until rollers seat on the pipe then tighten the knob 1/4 turn more. Hold knob and roll pipe cutter one revolution around the pipe. You’ll notice a small groove on the pipe as the cutter cuts into the copper. Tighten knob clockwise 1/4 turn more, then make another revolution. As you continue this two-step process, you’ll cut deeper into the pipe until you cut all the way through it.
Turn off the main water shut-off valve; then open a faucet at the lowest point in the home. This drains the water from the pipes. Use a measuring tape to determine the length of pipe needed and use a pencil to transfer the measurement to the new pipe. When figuring the overall length of the replacement piece of pipe, make sure to take into account the ends, which will slide into fittings. The total length of the replacement piece of pipe and the two couplings, when fully assembled, must be about 3/4 inch longer than the length of the damaged pipe.
Another way to temporarily stop a small leak involves a c-clamp, a block of wood, and a piece of rubber. Because the block of wood is flat (and the pipe is round), it can only create pressure along a very narrow area of the pipe. Follow these steps: turn off the water at the main shut-off valve.
Conclusion to DIY Quick Fix Copper Pipe Leaks
If you live in a region that is prone to frost, leaks can be caused by many reasons, including pin-holes and general water expansion inside the pipe and/or spigot.
To prevent frost damage, follow these steps: close the main water shutoff valve and drain the water from the spigot(s). Wrap the spigot and any exposed pipes with pipe insulation (usually cylindrical foam pieces). Duct tape them for a tight and secure seal.
If it’s too late, watch our video with all the DIY Quick Fix Copper Pipe Leaks you could possibly need.


Amazing information you have shared in this article. This article helps me a lot and also I found some unknown information in this article. Thank you for the information.
OMG! Did I have a leak! Early freeze up and recent thaw caught me out, but I can say that these tips are only available on a few websites, and the idea to a non-DIYer was a new one but paid off. Once we had mopped up, the temporary fix we applied just about held until the plumber got here. Cool tips and I’d have had to spend on a lot of replacement furnishings if I’d not tried out these tips.