A leaky tap can be annoying with its constant drip, drip, drip, but have you ever considered about how much water is wasted. It could be thousands of litres a year! So how do you stop that dreaded drip? Firstly you will need to source the leak, then take your tap apart and then replace the appropriate part. Here’s some handy hints: The most common leak is from the spout. It’s commonly caused by either a worn tap valve, a damaged or worn seat or even both. Before you start you will need to isolate the water flow, in most cases this means accessing your water meter and turning it off. If you are unsure of where to find it you may need to contact a licensed plumber. Now that you have isolated the flow and turned your taps on, you are ready to roll.
You will need to disassemble your taps by removing the handle, flange and then removing the spindle. You will need a tube spanner or adjustable spanner for this depending on which taps you are repairing. Remove the spindle from basin and then remove the tap valve. Before you replace the tap valve, inspect the tap seat for signs of aging or damage. It should be smooth to touch and free of any blackened build up. If you are going to spend the time dissembling your tap you may as well reseat it too, because if you replace your tap valve and the tap seat is damaged, it will probably damage your brand new tap Fixatap valve. To reseat your tapware screw the tap reseater into your basin and apply a little downward pressure while turning the reseater handle in a clockwise direction.
Here’s a little tip, if you are using a tap reseater with a metal disc, you’ll need to disengage the cutter while turning. This will ensure that you don’t leave score marks on the tap seat. Another great idea is to replace the o-ring and fibre body washer and lubricate the spindle thread and o-ring. This will make your taps turn like they’re brand new. Use your bonnet cleaner to clean the inside thread of the bonnet like this, and then reassemble the spindle and bonnet. Replace the fibre body washer and then your spindle is as good as new. When you replace your tap valve it is important to use the best quality, otherwise you will be doing this process frequently.
As found on Youtube
If you have done this and your tap is still leaking you may need to reseat the tap to repair damage to the original smooth metal face on which the washer must seat cleanly if leakage is to be prevented. If this is your problem we recommend that you watch the video below:
How to Reseat a Leaking Tap/ Dripping Tap
Honest reviews and advice.
Hello, my name’s James.
Welcome.
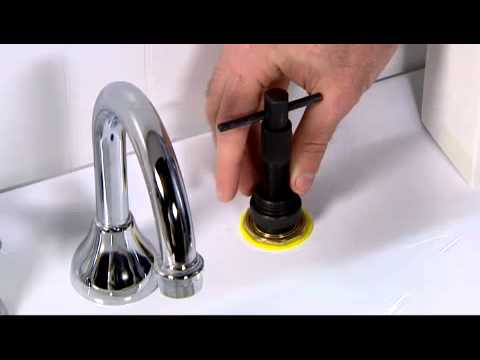
Today we’re going to show you how to use a tap reseating tool.
This particular one is made by Monumement DIY. The good thing about a reseating tool is that it can save you loads of money on buying a new tap, especially after you’ve changed a washer in a tap and it is still dripping.
A tap reseating tool smooths off the metal face onto which the washer connects.
Turn the water off and use a small screwdriver to remove the screwcap cover. Inside you should find a small screw. Undo this screw. Once the screw is removed, pull the tap head out of the way.
Remove the chrome tap mechanism cover, and using an adjustable spanner, turn this anti-clockwise to remove the mechanism.
Now we can see inside the tap.
The smaller hole that is further away is the tap seat that we intend to grind down.
Tap reseating tools come with different threads. Now’s the time to choose the right one.
This one looks like it fits fine. Once you’ve selected the right thread for your tap, slide that onto the handle shaft of the tap reseating tool. Select the right size of blade for the tap and run the onto the thread on the end, making sure that the blade jagged teeth are pointing towards the tap.
Attach the tap reseating tool and apply downwards pressure whilst twisting.
Slowly you should grind away a new face on the tap.
When this is done, remove the reseating tool and have a look at your work. As you can see the new seat is now lovely and shiny.
Reassemble the tap in reverse order, turn the water on and you’re done. Plumberparts.co.uk Honest reviews and advice..
As found on Youtube
For more tap leak cures go to how to mend a leaking tap – washer or ceramic disc.


O.K. Thanks. I did this, but after 2 weeks the tap is dripping again. What next?
I went out and fixed our dripping tap. I did everything myself but hubby had to use his muscle to get that last bit of the tap apart. Why are they so tight? It’s a male conspiracy. Men MUST STOP being bloody awkward B’s and JUST STOP tightening these things so TIGHT. Men are Pathetic ‘Oh! wifey, darling let me help you. You won’t be able to loosen that”. So, WHY do you need to prove your manhood by over-tightening everything.
Have a Victorian tap. Lasted for ever. Nobody has a tap like it now. Tell me who will turn a new thread on it Money not important. Thanks!